Wednesday, July 27, 2011

Pasta with Olives, Garlic, & Sun-dried Tomatoes


You may be thinking, WOW! this family sure does eat a lot of pasta and you are right. We love pasta! You can really get creative when it comes to pasta.

I hardly every get the time to really read some of the many recipe emails I get each day, but something caught my eye about this next recipe that was in my email box from Seventh Generation. I knew right away it would be a winner in our house.

I did make some very small changes so I will list the entire recipe below or feel free to check out the original by clicking on the recipe name below.

Pasta with Olives, Garlic & Sun-dried Tomatoes

Ingredients:

1 pound of ziti, rotini or bow tie pasta
1/2 cup of Mezzetta Napa Valley Bistro - Pitted Greek Kalamata Olives - sliced (these olives made all the difference in the world for this recipe - they added so much flavor)
1 cup plain sundried tomatoes, chopped (soak them in boiling water to soften them up and bring out their flavor)
3 cloves of garlic, pressed
1 cup Freshly Shredded Parmesan cheese
4-6 tablespoons of olive oil

Bring a big pot of water to a boil. Add pasta and cook according to directions on the box.

As soon as you put the pasta in, heat a very large frying pan over medium heat and add olive oil. After one minute add garlic. Cook for about 30 seconds. Turn heat down to low and add sun dried tomatoes, olives, and a pinch of salt, and cook until the pasta is done.

Remove pasta from pot with a slotted spoon, and add directly to the frying pan. Ladle into the pan at least one cup of the liquid the pasta cooked in. Stir thoroughly.

Pour into a large bowl and sprinkle with cheese.

Serve with a salad and fresh bread.

*My husband does not really care for sun-dried tomatoes, but he said this pasta recipe was awesome!

Tuesday, July 26, 2011

Trying New Recipes


Last week was not a good week for trying new recipes. We tried several new recipes that I was really excited about sharing with you, but none of them were as good as I wanted them to be. However, I decided I would post links to them if you want to give them a try and see what your family thinks.

Homemade Black Bean Veggie Burgers
- These burgers were not fun to make. They stuck to everything. The burgers had a good taste, but they were not outstanding. I kept thinking they needed something, but I could not put my finger on it.

Watermelon & Prosciutto Salad with Honey Vinaigrette
- My husband was the only one who could tolerate this salad. I thought the combination of the feta with the watermelon was just not a great match.

Cinnamon Apple Biscuits - These biscuits had a great cinnamon flavor, but were much drier than I thought they should be. This could be my fault though because I have to confess that I am not much of a baker.

Wacky Bake - Out of all the recipes that we tried last week, this one was the only one that truly pleased everyone at the dinner table. However, I cheated a little and used jar spaghetti sauce and added shredded carrots to the meat while it was cooking.

I am hoping that this week is more successful than last week and I can bring you more great recipes.

If you have tried a new recipe that you would like to share, please post it under comments. I would love to get more recipe ideas and I am sure others would like to as well.

Saturday, July 23, 2011

Banana "Ice Cream" with Chocolate Sauce (No Machine Required)

If you have been reading my blog for even just a short while you know that I have an extreme love for chocolate. I like for my kids to enjoy chocolatey treats from time to time, but I do not like the extra sugar and fat that goes in most of them. This recipe is a wonderful alternative to ice cream and was a perfect refreshment to our 100 degree weather. With that being said let me share a recipe that I found in the July issue of All You magazine.

This recipe is an excellent use of those super ripe bananas and it looks just like ice cream.

Banana "Ice Cream" with Chocolate Sauce (No Machine Required)

Ingredients:

4 oz semisweet chocolate chips or chunks
3 Tbsp water
5 ripe bananas (peeled, cut into small chunks and FROZEN)
1/4-1/2 cup of fat-free milk
1/2 tsp vanilla extract

Place chocolate chips in a microwave-safe bowl and add 3 Tbsp of water. Heat on high for 30 seconds, stir. Heat again for 30 more seconds or until chocolate is completely melted and becomes smooth.

Place frozen bananas in a food processor and pulse until broken down. Add milk and vanilla and process until smooth. You may need to scrape the sides and break up any chunks you see.

Place banana "ice cream" into dishes and top with chocolate sauce.

It tastes much better than it looks in this picture. I let the ice cream melt too much before I was able to take the picture. I promise it is super delicious!

The perfect addition to this treat would be nuts. Add your favorite nuts and you have an ice cream sundae without all the added sugar and fat.

*You could also add a Tbsp of peanut butter/sunflower butter to have that perfect balance of sweet and salty.

Monday, July 18, 2011

Chicken Taquitos - Baked


I have a funny story to share with everyone that did not turn out to be a complete disaster. My husband's family was here for the weekend and our dinner plan for Saturday night was

BBQ Chicken on the Grill
Fresh Corn
Southern Collard Greens
Garlic Rolls

My husband put all the chicken pieces onto the top rack of the grill on a low setting to cook it very slow. He then went upstairs to spend time with his parents. I was preparing the side dishes in the kitchen when I looked outside and saw flames shooting out of the side of the grill. I screamed upstairs for my husband, who soon discovered the chicken was on fire (or at least most of it). He was able to salvage the meat inside some of the pieces of chicken, but a few of them were completely black to the bone.

My husband is an awesome cook and an even better grill master, but we all have those days when things just don't seem to work out the way we hoped.

Needless to say, we had to purchase grilled chicken elsewhere and the dinner turned out to be fantastic.

I used the salvaged pieces of chicken to make chicken taquitos and here is the recipe.

Chicken Taquitos (Baked)

Ingredients:

3 to 4 cups of leftover or rotisserie chicken
1/2 cup of onion
1/4 cup of green pepper
1 to 2 cloves of garlic (minced)
1 tbsp of olive oil
2 tbsp of homemade taco seasoning or store-bought
1/4 cup of vegetable or chicken broth
7 oz of salsa
1/2 cup of cheddar, monterey jack or mexican cheese
20 small corn tortillas

Preheat oven to 425 degrees. Spray two 9 x 13 casserole dishes with non-stick spray.

Heat olive oil in skillet. Cook green pepper and onions until soft. Add minced garlic and cook for 30-60 seconds longer. Add taco seasoning and stir. Let the flavor combine for 1-2 mins. Add 1/4 cup of broth, stir, and simmer for 2 minutes.

Add leftover or rotisserie chicken and salsa. Simmer for about 5-10 minutes. Turn off heat.

Place a small batch of corn tortillas onto a microwave safe plate and cover completely with a wet paper towel. Heat in the microwave for 40-60 seconds. Carefully take one tortilla out of the microwave. Cover remaining tortillas with wet paper towel.

Fill tortilla with chicken mixture and sprinkle with cheese. Roll tortilla and place into 9 x 13 casserole dish. Brush or spray a little olive oil on tortilla to prevent it from cracking while you are rolling the remaining tortillas.


Continue until all tortillas have been used. Cook for 10-12 minutes (do not cover).

Since the taquitos are baked they do tend to crack quite a bit. We did not mind because they tasted so good.

This makes quite a bit of taquitos so I froze the remaining ones.

I served these with leftover rice and fresh cantaloupe. My youngest said they were "nummy", which translates to yummy.


Friday, July 15, 2011

Chocolate Tahini Cookies


If you looked at my previous post you may have noticed that I made homemade tahini. I used it to make hummus and then thought maybe it would be good with chocolate. I have an enormous sweet tooth. I begin researching the web trying to find a chocolate tahini recipe that had under ten ingredients and was easy to make.

I found a recipe for Chocolate Tahini Cookies and had to give it a try. I am so glad I did because it was fantastic. The whole family loved it and I felt great serving it to them since it did not have butter or sugar. I would love to know what you think if you give it a try.

Chocolate Tahini Cookies

  • 1/2 cup unbleached all-purpose flour
  • 1/2 cup ground oats (grind rolled oats in a spice grinder or food processor)
  • 1/2 cup cocoa powder, sifted
  • 1/2 tsp baking powder
  • 1/2 tsp baking soda
  • 1/2 tsp sea salt
  • 1 cup homemade tahini or store-bought
  • 1/2 cup natural maple syrup
  • 2 tsp pure vanilla extract
  • 1/4 cup chocolate chips or chunks (I used chunks because that is what I had on-hand)
In a medium bowl, whisk together the flour, ground oats, cocoa powder, baking powder, baking soda and salt. Set aside.

In a large bowl, combine the tahini, maple syrup and vanilla extract.

Spoon the flour mixture into the tahini mixture and mix to combine. Gently stir in the chocolate chips.

Line a cookie pan with parchment paper and drop the cookie dough by large tablespoons onto the pan. Flatten the cookies with the bottom of a glass or your hand. Although, my cookies are not pretty in appearance the taste is rich and colorful.

Bake at 350 degrees for 10 minutes or until the cookies have cracked slightly and the tops are almost dry to the touch. Cool completely on a wire rack. Store cookies in a tightly-covered container at room temperature.

Thursday, July 14, 2011

Update: Homemade Tahini


I have to apologize for not posting this sooner. Things have been crazy around here. My oldest son just started kindergarten and the whole house is trying to adjust.

Now it is time to get back into cooking. After receiving 4 bags of Bob's Red Mill White Hulled Sesame Seeds I decided it was time to make homemade Tahini.

Homemade Tahini

16 oz bag of sesame seeds
2/3 cup of olive oil


Toast the entire bag of sesame seeds in a skillet over medium-high heat. You will need a pretty large skillet. Continue to toss the sesame seeds every few seconds until they are very lightly toasted. I say very lightly toasted because I did happen to over cook a few and it changes the taste.
Remove sesame seeds from the skillet and place in a bowl to cool. This is very important because if you leave them in the skillet even after removing from the stove they will continue to cook.

Place cooled sesame seeds into food processor. Let olive oil drizzle through the liquid feed tube. Pulse for about 3 mins or until you have reached desired consistency. Store in refrigerator.
You can use less or more olive oil depending on how you like it.


*After making the Tahini I then used it to make homemade hummus. My husband said it was spectacular!

More recipes to come using Tahini.........

Wednesday, July 6, 2011

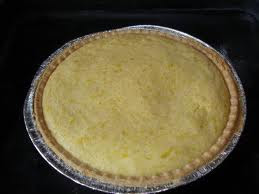
Yellow Squash Pie


My mom and dad have a wonderful garden and they love to share their bounty. This past week when we went to visit they gave us so many vegetables that I had to find alternative ways of cooking them.

For the tomatoes, my husband canned homemade salsa (if I can ever get him to write down his ingredients I will post it). With all the zucchini we made a zucchini casserole and chocolate zucchini muffins. Now that left me with 7 whole squash.

My kids do not like squash at all. I have tried it so many different ways. I have even completely hid it in a main dish and they took one bite and knew it was there.

I thought maybe if I made it sweet they would eat it, so I started to do some research. I came across a recipe for squash pie. Apparently, squash pie is a southern favorite. Well, I am from the south and I have never heard of it.

Tallying the scores after we tried this dish: 3 liked, 1 did not like - you just can't please everybody :-)

Yellow Squash Pie

4 Medium sized yellow squash diced
1/4 Cup of melted butter (I used Bestlife butter)
3/4 Cup of sugar
1 Tbsp of vanilla extract or lemon extract
1 Tbsp of unbleached all-purpose flour
2 Egg yolks, beaten
Dash of salt
9-inch Pie shell (homemade or store-bought)

Steam squash or cook in boiling salted water until tender. Drain squash and mash or pulse a couple times in the food processor (not too much or it will liquify).

Combine butter, sugar, and vanilla extract; stir in flour, beaten eggs, and mashed squash, with a dash of salt.

Pour squash mixture into baked pie shell; bake at 375° for 25-30 minutes, or until firm. My pie did not get firm until I took it out and let it sit.

*The original recipe for Squash Pie called for 5 medium squash. I tried it with 5 and it was too much for my pie crust. The original recipe also suggested slicing instead of dicing the squash, but I thought it would be easier to mash if they were diced.

Freezer Pesto


If you have been reading my blog you know how much my family LOVES pesto. Since the basil in our garden is in full swing, I decided to start freezer canning some pesto to last for the winter months.

My challenge with this recipe is to find a cheaper place to get pine nuts. My local grocery used to sell the pine nuts for $6.99 for a 6oz bag and now it is $6.99 for a 4oz bag. I think I will start doing a little searching this week at Whole Foods and Trader Joes to find a better price for pine nuts. If you have any suggestions as to where I could get these nuts cheaper please let me know. All in all it is still cheaper to make the pesto homemade than buying the jar pesto.

This recipe is in the Ball Blue Book Guide to Preserving. It is super easy and tastes so fresh.

Freezer Pesto

Ingredients:

(Yield: about 2 half-pints)

1 cup pine nuts
4 cups of fresh basil leaves, firmly packed
2 cloves of garlic, (it states to crush, but I put them in the processor whole)
1 cup of parmesan cheese
1 cup plus 1 tbsp extra-virgin olive oil

Place the pine nuts in a skillet and heat on medium. Lightly toast them. Be very careful, because the nuts will burn rather quickly if you do not toss them around every 15-30 seconds.

Puree toasted pine nuts, basil and garlic in a food processor or blender until smooth.

Add parmesan cheese and blend.

Add 1 cup olive oil through the feed tube of the processor or lid of blender in a slow steady stream while the machine is running.

Pour pesto into plastic freezer jars or containers, leaving 1/2 inch headspace (I used the Ball plastic freezer containers and they worked great). Drizzle 1 1/2 tsp olive oil over the pesto. Label and freeze.

Tuesday, July 5, 2011

Lemonade


It is so hot outside, what sounds better than a tall refreshing glass of homemade lemonade. I recently purchased a small juicer and was excited to find an awesome recipe for the "Perfect Lemonade". I follow this recipe exactly as it is written except I use less sugar. Enjoy!

Lemonade

Ingredients:

3/4 cup of sugar
1 cup of water
1 cup of lemon juice
4 cups of water

Make simple syrup by heating the sugar and water in a small saucepan until the sugar is dissolved completely.

While the sugar is dissolving, use a juicer to extract the juice from 5 to 6 lemons, enough for one cup of juice.

Add the juice and the sugar water to a pitcher. Add 4 cups of cold water, more or less to the desired strength. Refrigerate 30 to 40 minutes. If the lemonade is a little sweet for your taste, add a little more straight lemon juice to it.

Serve with ice, sliced lemons and some mint leaves.

Saturday, July 2, 2011

Hot Dog Jambalaya


You may be saying to yourself, what can I do with these leftover hot dogs from the 4th of July? Well, I found a recipe that may help. I have to say that when I first made this I thought it looked rather unappetizing. However, the kids did not hesitate to dig right in. It tasted much better than it looked.


Hot Dog Jambalaya

Ingredients:

1 tbsp olive oil
4-5 hot dogs (turkey, chicken, beef, pork, or meatless) - cut into circles
1/2 onion diced finely
1/2 green, red or yellow bell peppers - diced finely
1-2 ears of corn - cooked and cut from cob or 1 can (10 oz) unsweetened corn, drained
1 can (15 oz) tomato sauce
1 tsp chili powder
A couple shakes of hot pepper sauce, to taste

In a large skillet, heat the olive oil over medium heat. Add the hot dogs, onions, and peppers. Saute them until the onions and peppers are softened.

Add the corn, tomato sauce, chili powder, and hot pepper sauce to taste. Heat through until all the flavors are incorporated. Serve over rice.

I paired this with a side salad. I hope your family enjoys!