Showing posts with label dessert. Show all posts

Thursday, February 7, 2013

Super Simple Strawberry Smoothie


My husband convinced me to purchase a hand held blender because of my lack of success with other mixers.  I have destroyed three mixers over the course of a few months.

I purchased the Cuisinart Smart Stick Hand Blender and I have been so happy with it.  Here is a super simple recipe for a Strawberry Smoothie that I think you will enjoy!


Super Simple Strawberry Smoothie

Ingredients:

1 Cup frozen strawberries
1 Very ripe banana
3/4 Cup milk (skim, almond, coconut)

Place all the ingredients into a container and blender with hand blender or place all ingredients into a blender and blend.  

All done!  Enjoy!

- There are many other ingredients you could add to this smoothie to make it extra healthy, but I like it simple.

Wednesday, September 26, 2012

Flourless Chocolate Zucchini Brownies

Flourless Chocolate Zucchini Brownies
Let me start out by saying that these brownies are addictive.  That is if you can get past the texture part of the brownie.  My kids and I loved these brownies, but my husband could not get past the spongy texture.  They are definitely different from ordinary flour brownies, but a healthy alternative for sure.

I found the original recipe for these Flourless Zucchini Brownies on the food blog Delighted Momma.  I did make some changes to the recipe based on what I had on hand.  


Flourless Chocolate Zucchini Brownies

Ingredients:

1/2 Cup natural peanut butter
1 1/2 Cups peeled, shredded and chopped zucchini
1/3 Cup molasses
1 Egg
1 Tsp vanilla
1 Tsp baking soda
1 Tsp cinnamon
1/2 Tsp nutmeg
1 Cup semi-sweet chocolate chips

Preheat oven to 350 degrees.  Combine all the ingredients into a large bowl and mix everything together.

Pour into a greased 8x8 baking pan.

Bake for 35-40 minutes, or until a toothpick comes out clean

Sunday, August 12, 2012

Chocolate Cheerio Treats

Chocolate Cheerio Treats
As you all know I LOVE chocolate.  The other day I really wanted a snack with some chocolate, but of course, we did not have any.  I decided to put some things together to make these super chocolatey treats.

Sorry to say that I did not measure anything so please feel free to change the ingredients according to your tastes.  Next time I make this I think I will put less sugar and less honey.

Chocolate Cheerio Treats

Ingredients:

*Measurements below are estimates

1/4-1/2 Cup Honey
1/4-1/2 Cup Sugar
1/2 Cup Peanut Butter
1/4-1/2 Cup Semi-Sweet Chocolates
Handful of small marshmallows
3 - 3 1/2 Cups Regular Cheerios

Melt honey, sugar, peanut butter, chocolate and marshmallows in a large saucepan over medium-low heat.  

Once completely melted remove from heat and add cheerios.  Stir to combine completely.

Press into a 9 x 13 pan and let cool.  If you like your chocolate treats a little thicker press into a 9 x 9 pan instead. 

Once cooled, cut into squares and enjoy!

Friday, July 6, 2012

Chocolate Zucchini Muffins

Chocolate Zucchini Muffins

If you saw the post before this one you know I have an enormous amount of zucchini.  Since my kids are not to fond of the texture of zucchini I went in search of a great recipe to hide it.


I came across this awesome recipe for Chocolate Zucchini Muffins and had to give it a try.  WOW!  These zucchini muffins, or you could call them cupcakes, were so spectacular.  


Here is the original recipe for Chocolate Zucchini Muffins.  The only changes I made were to use whole wheat flour instead of pastry flour and buttermilk in place of non-dairy milk.


Let me know what you think.

Friday, June 1, 2012

Chocolate Kale Muffins

The kale is almost invisible

My local grocery had a large 16oz bag of kale on sale for $1.49 and I just could not pass it up.  I have a little experience making kale chips and using kale for soups, but I wanted to find other recipes too. 

I came across a recipe for Chocolate Kale Muffins that sounded out of this world.  Boy, these muffins were rich, moist and super chocolatey.

After my kids completed their chores the Thursday I told them they could have a lollipop as a treat.  They both told me they would much rather have the Chocolate Kale Muffins instead...yeah!

Follow this link to the Chocolate Kale Muffin recipe.

Wednesday, April 11, 2012

Banana Cream Parfait


My intentions were to grab a picture of this scrumptious dessert, however it was gobbled up so quickly I never got a chance.

My kids ate their vegetables in a heartbeat so they could eat this yummy dessert and they were not disappointed.


Banana Cream Parfait


Ingredients:

1 Package vanilla pudding, prepared
Graham crackers (as many as you like)
1-2 Bananas, sliced
Nuts (I used pecans) - optional
Honey, drizzle over the top of each

Layer the first four ingredients into a glass or small bowl and drizzle the honey over top, serve.

My oldest son said this dessert reminded him of homemade banana pudding. I think we will be having this again very soon!

Wednesday, April 4, 2012

Hot Cross Buns for Good Friday

My kids are really excited about making Hot Cross Buns on Good Friday. I figured I would go ahead and post the recipe for these delicious treats if you wanted to also make them on Friday (or any other time).

Along with the Resurrection Rolls, these buns are another great way to help kids understand the Easter story.


Hot Cross Buns

Ingredients:

¾ cup scalded milk
3 tablespoons butter
¼ cup white sugar
½ teaspoon salt
2 eggs
3 cups all-purpose flour or whole wheat
1 tablespoon active dry yeast
¾ cup dried plums, currants or raisins
1 teaspoon ground cinnamon

Put milk into a saucepan and scald it. Let it cool until it’s lukewarm.

Add warm milk, butter, sugar, salt, one egg + one egg white (save the yolk to coat the buns later), flour, and yeast in bread maker to mix and knead.

When the kneading cycle is almost finished (some machines beep at this point), add the raisins and cinnamon.

When dough cycle is completed remove the dough from bread maker and press it out on a floured surface.

Cover it and let rest 10 minutes.

Shape dough into 12 balls and place them in a greased 9 x 12 inch pan.

Cover the pan and let the dough rise in a warm place 30-40 minutes, until doubled.

Mix the egg yolk and 2 tablespoons water and brush on buns.

Bake at 375º F for 20 minutes and allow to cool on a wire rack.

Frosting Recipe

Ingredients:

½ cup confectioners’ sugar
1 teaspoons milk or water

Mix together confectioners’ sugar and milk.

When the buns have cooled completely brush frosting on each bun making a cross.

Monday, April 2, 2012

Resurrection Rolls

Our family enjoys reading our bible and working together on various bible activities. I am always searching for projects and activities to increase my kids knowledge of the word of God. It is a way for our family to connect and spend time together.

Recently I began searching the internet for great Easter activities. I came across a super cute hands on activity to communicate the death and resurrection of Jesus Christ to young children, called resurrection rolls.

You can get the complete directions and pictures on how to make resurrection rolls here.

Friday, March 9, 2012

Kiwi Breakfast Cake


Before posting this delicious recipe for Kiwi Breakfast Cake I would like to share something with you. A few years ago I began a nighttime bible study at my church. I met a wonderful Christian lady in that study that has become an amazing friend. She is such an encourager and I am extremely grateful that God has put us together. I would like to dedicate this post to her. Melanie, thanks for allowing God to speak through you.

Melanie, I still have not made that Texas Sheet Cake you recommended, but I did make this delicious Kiwi Breakfast Cake that I hope everyone enjoys.

This recipe can be found in Rachel Ray's EveryDay magazine (the only change I made was to reduce the sugar).

Kiwi Breakfast Cake

Ingredients:

2 Kiwis
1 Cup milk at room temperature
2 1/4 Cups flour
1 Tsp baking powder
1 Tsp baking soda
1 Tsp cinnamon
3/4 Tsp salt
1 Stick unsalted butter at room temperature
3/4 Cup sugar
3 Eggs

Preheat oven 350°

Slice the ends off the kiwis and press pulp from the ends through a small colander or fine-mesh sieve into the bowl of milk. This will allow the milk to curdle. Set it aside for about 10 mins.

Peel kiwis and slice very thin.

In a large bowl, combine flour, baking powder, baking soda, cinnamon and salt.

In a mixer combine the butter and sugar until fluffy, about 5 mins. Beat in each egg, one at a time at a low speed.

Pour milk into egg mixture followed by dry mix until completely combined.

Pour batter into a 10-inch cast-iron skillet that has been buttered or sprayed with cooking spray. Completely cover the top of the batter with kiwi slices without overlapping.

Bake for about 40 mins or until toothpick inserted in the center comes out clean.

Thursday, December 22, 2011

Grandma's Pecan Pie


A friend of mine asked me to post a recipe for Pecan Pie. Although, I usually try to keep things somewhat healthy on this blog, I had to make an exception for Grandma's Pecan Pie.

My mom is bringing this same Pecan Pie to our Christmas gathering on Sunday. My mouth is watering right now to taste it. I don't think I have had it since last year.

I hope you enjoy it!

Grandma's Pecan Pie

Ingredients:

3 Eggs, slightly beaten
1 Cup dark corn syrup
1/4 Cup sugar
2 Tbsp butter, melted
1 Tsp vanilla
1 1/2-2 Cups pecan, crushed or broken (My mom says she uses 2 cups, but my grandma insists on 1 1/2 cups - you decide)
1 Deep dish pie crust (9-inch)


Preheat oven to 350°.

Combine all ingredients and put into pie crust. Cook for about 40-50 minutes. This time may vary quite a bit depending on your oven so keep checking the pie. If you tap the center of the pie very lightly it should spring back. It will completely set after cooling.

*Tip - If the edges of the pie crust are browning more than you like you may over them with aluminum foil.

Wednesday, October 12, 2011

Pumpkin Chocolate Chip Granola Bars


I still have some pumpkin puree left even after making Pumpkin Mousse Pie, Pumpkin Oatmeal, and Pumpkin Pancakes. We are currently out of granola bars, therefore what is a mother to do, but make her own, right? Dare I say Pumpkin Granola Bars....wait how about Pumpkin Chocolate Chip Granola Bars?

I found a delightful recipe for Pumpkin Chocolate Chip Granola Bars and had to give it a try. Let's just say these granola bars are going to go fast. Now why did I not think ahead and double the recipe. I guess I will be making more this weekend.

Enjoy!


(This is what it looked like before they entered the oven)

Saturday, October 8, 2011

Pumpkin Mousse Pie


It's fall and I have an incredible craving for pumpkin. I have always wanted to cook my own pumpkins and have fresh pumpkin for a variety of recipes. Well, this year I decided to do just that.

I cooked two whole small pumpkins in the oven brushed with olive oil for about 60 mins. at 400°. I let them cool and then cut them open to retrieve the pulp and pumpkin seeds. I washed the pulp away from the seeds, coated them with olive oil and a couple dashes of salt, and roasted for a few mins in the 400° oven.

I then removed the flesh of the pumpkin and decided to make some pumpkin recipes. First I started with a simple and super delicious family favorite dessert. I made this dessert last year for Thanksgiving and it was a complete hit. As you can see by the picture we only have a little over a slice left and I just made this last night.

Pumpkin Mousse Pie

Ingredients:

1 1/4 Cup cold fat-free milk
1 Package vanilla flavor instant pudding or sugar-free vanilla pudding mix
1 Tbsp pumpkin pie spice (here is a recipe for pumpkin pie spice mix)
1 Cup fresh or canned pumpkin
1 Tub whipped topping or sugar-free whipped topping
1 Graham cracker reduced fat pie crust or homemade

In a large bowl beat milk, pudding mix, and spice with a wire whisk for about 2 mins. Whisk in the pumpkin. Fold half of the whipped topping into the mix.

Spread into pie crust and top with remaining whipped topping.

Refrigerate for 2 or more hours. Must be stored in the refrigerator.

What is your favorite way to use pumpkin? I would love to have your feedback.

**Come join the fun at the My Baking Addiction and GoodLife Eats Holiday Recipe Swap sponsored by Chicago Metallic.

Wednesday, October 5, 2011

Chocolate Avocado Mousse

While eating my salad with avocado for lunch today, it just came to me that I have yet to post the creamy and oh so delicious Chocolate Avocado Mousse recipe that is a family favorite.

For all those people out there that do not like avocado, please keep reading. My mother absolutely dislikes avocado (texture and taste), but she LOVED this avocado mousse. If your kids do not like avocado, just try this recipe and I am pretty sure they will change their minds.

Here are my changes:

Chocolate Avocado Mousse

Ingredients:

4 oz Semisweet chocolate
1 Tbsp water
2 Avocados
2 Tbsp cocoa
2 Tbsp pure maple syrup
2 Tbs honey
Pinch of salt
1/4 cup natural peanut butter

Place chocolate and water in a microwave safe bowl and microwave for 30 seconds. Stir chocolate and continue to cook in microwave until chocolate has melted completely.

Place avocados in food processor and pulse. Add cocoa, maple syrup, honey, salt and chocolate, process. Once ingredients are combined add peanut butter and continue to pulse until completely combined.

Serve in individual bowls and enjoy!

*This treat is very rich so a little goes a long way

Saturday, July 23, 2011

Banana "Ice Cream" with Chocolate Sauce (No Machine Required)

If you have been reading my blog for even just a short while you know that I have an extreme love for chocolate. I like for my kids to enjoy chocolatey treats from time to time, but I do not like the extra sugar and fat that goes in most of them. This recipe is a wonderful alternative to ice cream and was a perfect refreshment to our 100 degree weather. With that being said let me share a recipe that I found in the July issue of All You magazine.

This recipe is an excellent use of those super ripe bananas and it looks just like ice cream.

Banana "Ice Cream" with Chocolate Sauce (No Machine Required)

Ingredients:

4 oz semisweet chocolate chips or chunks
3 Tbsp water
5 ripe bananas (peeled, cut into small chunks and FROZEN)
1/4-1/2 cup of fat-free milk
1/2 tsp vanilla extract

Place chocolate chips in a microwave-safe bowl and add 3 Tbsp of water. Heat on high for 30 seconds, stir. Heat again for 30 more seconds or until chocolate is completely melted and becomes smooth.

Place frozen bananas in a food processor and pulse until broken down. Add milk and vanilla and process until smooth. You may need to scrape the sides and break up any chunks you see.

Place banana "ice cream" into dishes and top with chocolate sauce.

It tastes much better than it looks in this picture. I let the ice cream melt too much before I was able to take the picture. I promise it is super delicious!

The perfect addition to this treat would be nuts. Add your favorite nuts and you have an ice cream sundae without all the added sugar and fat.

*You could also add a Tbsp of peanut butter/sunflower butter to have that perfect balance of sweet and salty.

Friday, July 15, 2011

Chocolate Tahini Cookies


If you looked at my previous post you may have noticed that I made homemade tahini. I used it to make hummus and then thought maybe it would be good with chocolate. I have an enormous sweet tooth. I begin researching the web trying to find a chocolate tahini recipe that had under ten ingredients and was easy to make.

I found a recipe for Chocolate Tahini Cookies and had to give it a try. I am so glad I did because it was fantastic. The whole family loved it and I felt great serving it to them since it did not have butter or sugar. I would love to know what you think if you give it a try.

Chocolate Tahini Cookies

  • 1/2 cup unbleached all-purpose flour
  • 1/2 cup ground oats (grind rolled oats in a spice grinder or food processor)
  • 1/2 cup cocoa powder, sifted
  • 1/2 tsp baking powder
  • 1/2 tsp baking soda
  • 1/2 tsp sea salt
  • 1 cup homemade tahini or store-bought
  • 1/2 cup natural maple syrup
  • 2 tsp pure vanilla extract
  • 1/4 cup chocolate chips or chunks (I used chunks because that is what I had on-hand)
In a medium bowl, whisk together the flour, ground oats, cocoa powder, baking powder, baking soda and salt. Set aside.

In a large bowl, combine the tahini, maple syrup and vanilla extract.

Spoon the flour mixture into the tahini mixture and mix to combine. Gently stir in the chocolate chips.

Line a cookie pan with parchment paper and drop the cookie dough by large tablespoons onto the pan. Flatten the cookies with the bottom of a glass or your hand. Although, my cookies are not pretty in appearance the taste is rich and colorful.

Bake at 350 degrees for 10 minutes or until the cookies have cracked slightly and the tops are almost dry to the touch. Cool completely on a wire rack. Store cookies in a tightly-covered container at room temperature.

Wednesday, July 6, 2011

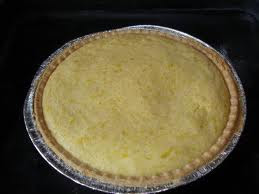
Yellow Squash Pie


My mom and dad have a wonderful garden and they love to share their bounty. This past week when we went to visit they gave us so many vegetables that I had to find alternative ways of cooking them.

For the tomatoes, my husband canned homemade salsa (if I can ever get him to write down his ingredients I will post it). With all the zucchini we made a zucchini casserole and chocolate zucchini muffins. Now that left me with 7 whole squash.

My kids do not like squash at all. I have tried it so many different ways. I have even completely hid it in a main dish and they took one bite and knew it was there.

I thought maybe if I made it sweet they would eat it, so I started to do some research. I came across a recipe for squash pie. Apparently, squash pie is a southern favorite. Well, I am from the south and I have never heard of it.

Tallying the scores after we tried this dish: 3 liked, 1 did not like - you just can't please everybody :-)

Yellow Squash Pie

4 Medium sized yellow squash diced
1/4 Cup of melted butter (I used Bestlife butter)
3/4 Cup of sugar
1 Tbsp of vanilla extract or lemon extract
1 Tbsp of unbleached all-purpose flour
2 Egg yolks, beaten
Dash of salt
9-inch Pie shell (homemade or store-bought)

Steam squash or cook in boiling salted water until tender. Drain squash and mash or pulse a couple times in the food processor (not too much or it will liquify).

Combine butter, sugar, and vanilla extract; stir in flour, beaten eggs, and mashed squash, with a dash of salt.

Pour squash mixture into baked pie shell; bake at 375° for 25-30 minutes, or until firm. My pie did not get firm until I took it out and let it sit.

*The original recipe for Squash Pie called for 5 medium squash. I tried it with 5 and it was too much for my pie crust. The original recipe also suggested slicing instead of dicing the squash, but I thought it would be easier to mash if they were diced.

Monday, June 20, 2011

I CANNED APPLESAUCE!


My husband and I have been interested in canning our own garden vegetables and local farmer's market fruit for quite some time. Well, I applied for the "Discover You Can House Party" sponsored by Ball. Much to my surprise I was chosen out of thousands to host a canning party. I received my party pack full of canning supplies on Saturday and started canning on Sunday. It was much easier than I thought and now we can enjoy fresh food all year long. If you are interested in canning here is a simple recipe to make applesauce and who doesn't like applesauce!

This recipe can be found in the
Ball Blue Book Guide to Preserving. Which I will be giving away at my canning party on Saturday.

How to Can Applesauce

Ingredients:

2 1/2- 3 1/2 pounds of apples per quart

Water

Sugar (optional)


Wash apples; drain. Core, peel and quarter apples. Cook apples until soft in a large covered saucepan with about an inch of water (enough to prevent sticking). Puree using a food processor/blender. Return the apple pulp to saucepot. Add 1/4 cup sugar per pound of apples or to taste, if desired. Bring applesauce to a boil, stirring to prevent sticking. Maintain temperature at a boil while filling jars. Ladle hot sauce into HOT jars, leaving about 1/2" headspace. Please remember to keep your jars hot either in hot water or hot dishwasher until you are ready to use them. Remove air bubbles with a non-metallic spatula gently pressing food against the opposite side of the jar. Adjust two-piece caps. Process pints and quarts 20 mins. in a boiling water canner. I used the Ball Discovery rack with lifter and it worked perfectly.


I followed these instructions and used 1/4 cup sugar per pound, but I think next time I will probably only use a tbsp or so (to retain color). It was a little sweet for our taste.

Happy Canning!